
If you go to Amazon.com, you'll find my new book priced at around $65.00. If hoping to buy before Christmas, please go direct to the publisher instead using this link: http://springhousepress.com/new-products/box-makers-guitar-book
The point of this book is the making of box guitars, but in this case, the reader gets to make hi or her own box.
Tuesday, December 19, 2017
My box making videos
I get regular messages from beginning box makers, concerned that my
box making videos are no longer available on youtube.com. My carefully
crafted videos had been put on youtube illegally to gain advertising
revenue for pirates in violation of my rights and the rights of their
producer Taunton Press. So while I apologize for the inconvenience,
there are other ways to gain legitimate access to the information. The
videos can be accessed through membership in the FineWoodworking website
, or downloaded for a small fee from Taunton.com
Taunton Press is having a Christmas sale. Customers can use the code Gift20 to get 20% off on all orders. This is a great chance to save on my books and books by other great authors! In addition they are offering a special package deal on my book Basic Box Making and the related DVD for a special price of $23.94. Use the discount code of Gift20 for an even greater holiday savings.
Taunton Press is having a Christmas sale. Customers can use the code Gift20 to get 20% off on all orders. This is a great chance to save on my books and books by other great authors! In addition they are offering a special package deal on my book Basic Box Making and the related DVD for a special price of $23.94. Use the discount code of Gift20 for an even greater holiday savings.
Saturday, August 19, 2017
a minimalist router table

While many woodworkers work days to make the perfect router table, mine, which has been in use for over 30 years was made in minutes, allowing me to get right to work.
As with many aspects of my work, I'd not set out to make something different. I was simply trying to do something with what I had at hand. Yesterday I met with the elementary school teachers at Clear Spring School to begin planning our woodshop activities with first through sixth grades. Today I will go shopping for walnut.
Make, fix, create, and increase the likelihood that others learn likewise.
Friday, August 4, 2017
barbed hinges..
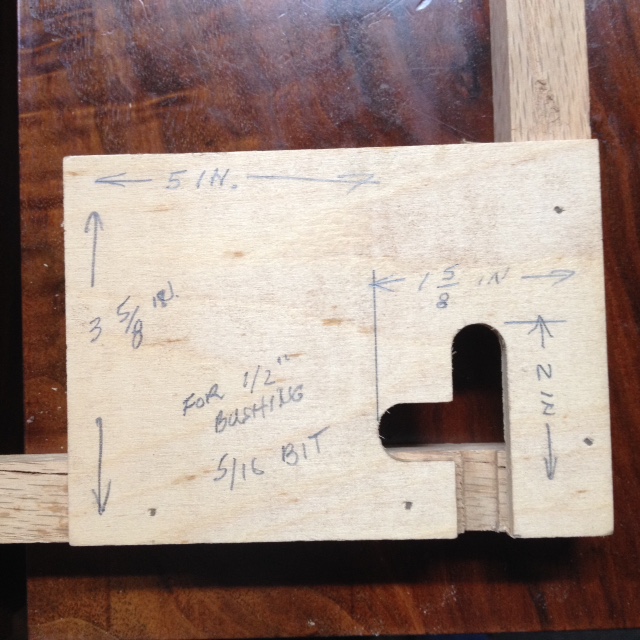
I was asked if there are simple ways to set up to install barbed hinges. The point is not to have a simple means but one that works, and the set up is not all that simple. As a jig for the drill press I made this:
 It is made from plywood and with its built in slide, it carries the box smoothly into the cut. Stop blocks must be added to accurately and firmly position the box during milling, and it relies on a shaft and blade from the manufacturer of the hinge, Craft-Inc.
The point is that if you want to use these hinges effectively, you must make some investment in their use. It's not a matter of just buying something that works under all circumstances, and for that reason, these press in place hinges may not be the number one go to hinge for some box makers.
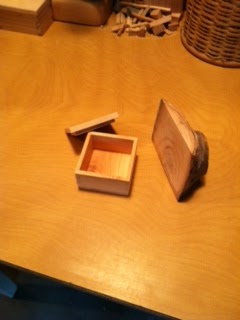
 Once the jig is made, a process of fine turning for the right depth is required. The cut away photo at left shows how the hinge must fit the slot. And below you can see the jig mounted to the drill press and with cutter mounted in the chuck.
 Make, fix, and create.

The point is that if you want to use these hinges effectively, you must make some investment in their use. It's not a matter of just buying something that works under all circumstances, and for that reason, these press in place hinges may not be the number one go to hinge for some box makers.
 Once the jig is made, a process of fine turning for the right depth is required. The cut away photo at left shows how the hinge must fit the slot. And below you can see the jig mounted to the drill press and with cutter mounted in the chuck.
Friday, July 7, 2017
A source of supply

My first two summer box making classes were full and are now past. I have two more coming up and there are still openings in each. Beginning July 24 I have a week long class in making Pocket Boxes at the Eureka Springs School of the Arts. August 7-11 I have a class in Creative Box Making at the Connecticut Valley School of Woodworking.
I frequently get questions about my teaching schedule, and these two classes are what remain. Join me if you can.
A woodworking club in Minneapolis asked if I could take a video of myself to help them sell their members on a proposed class in November. Self-produced video is out of my line, but I referred them to a video interview produced by friends, Murdo Laird and Nancy Paddock. https://www.youtube.com/watch?v=Ymu8Mwjy8f0
The photo shows drilling a sound hole in the top of a box guitar. I first fitted and glued a circle of walnut into a hole in the cedar top, and then drilled a smaller hole through it, giving the effect of an inlay. The loose piece at the center is scrap. Some sanding of the edges will finish the job.
Make, fix, and create.
Friday, June 23, 2017
book giveaway... Tiny Boxes

The brief excerpt describes how to put a lift tab in a pen box. It presents an elegant way to open a box. The same technique is useful for other designs as well.
Good luck! I hope that one of my readers wins. Two copies of the book will be given away.
Make, fix, and create.
Wednesday, May 31, 2017
completing the new shop.

As we prepare for the grand opening, I am struck by the enormity of this project, of which the wood shop is only a part. About 15 years ago, other artists and I were discussing the need that we had for an art school. We decided to build one. Not having money or resources, we decided to start as a school without walls, using various private studios in town. The purpose was three fold.
- Allow the various artists in town to have a means to engage others in the arts.
- Build the stature of the arts in a community that was already known for the arts.
- Preserve and protect our community, for artists are the ones who remind us to recognize and protect cultural and aesthetic values.
At this point in my own life, I am in awe of a number of things. And I am mainly reminded that people can gather together and add their strength to each others to accomplish what may turn out to be great things.The long range success of the school is not assured by any means. But our hope is that it gains in credibility, others in the community will realize its value to us, and step up in its support.
I, in the course of things was lucky to recognize a few things. As a newcomer to Eureka Springs, I invited a few members of the local community to gather and create the Eureka Springs Guild of Artists and Craftspeople. Through that organization and as first president, I fell into association with a number of wonderful artists. After that organization had met and worked for many years, we closed it specifically to form the Eureka Springs School of the Arts.
Put the date on your calendar, June 4, 2017. Come join us to celebrate the new wood shop. It will not be complete, as we may be fine tuning it for years.
Make, fix, create, and assist others in learning likewise.
Tuesday, May 30, 2017
design options...
 In my books, I express an interest in my reader's creativity by presenting design options. Why should I make all the decisions myself, when my readers had best learn to make decisions on their own?
Also, by having as many as three variations for each box, the reader finds more value in the book, and may be less inclined to just copy cold without adding something of their own soul to the making of it.
A reader contacted me, wondering how to make a finger jointed by with tapered sides like one he had seen in an article that I had written for Fine Woodworking magazine. That box, and the making of it is presented as a design option on p. 51 of Basic Box Making. It is an easy technique.
Make a finger jointed box with thicker than usual sides and then use the table saw or band saw to taper the sides.
Make, fix, and create...
Friday, May 26, 2017
warping lid...
When I retired, in 2015, I wanted to make wooden items. Your box books got me started. By now I have made a dozen and been guided by your hand and refer to the books all the time. If you have the time I would appreciate your advice on a problem I have never had before.My questions in response where:
8 days after completing this box the lid started to bow. 8 days!! The first week dead straight. I have tried cauls holding it bent the other way for 5 days, still bowed almost 1/8” in the middle. I can get it straight after using a heat gun, but not while the heat gun is heating it up. It straightens as the wood cools off to room temperature, but after an hour it bows again?! 175F degree oven for a few hours which does the same thing as the heat gun, as it cools, it’s straight, but a few hours later, it’s bowed again?! Sprayed water on the concave side to increase swelling put on the cauls, let it dry overnight, no effect. I have 12 days to correct this problem before presentation to a HS grad, my granddaughter. The lid and box are white oak, and the grain pattern flows around the box, ( so I don’t really want to redo the lid) and that oak was dead flat and straight AND dry when I cut it. It had been in the shop two years. The lid insert is book matched Zebrawood panels 3/8” thick I cut from a bigger piece. I believe it was dry too. But I never put a meter on it. I believe the problem is in the Zwood. It was a very tight fit inserting the Zwood into the rabbeted top of the box, before I ran it through the tablesaw to separate the lid from the box. But why 8 days to show up!?
How is the lid panel held in place? Is it a floating tongue and groove panel or is it simply glued in place? If it is glued in place, the answer is easy. To my eye it seems immediately apparent that it’s a tight fit, and that the zebra wood panel has expanded, forcing the lid to bow.It turned out that my observation was right. He had glued the panel in place. A painful lesson learned. Wood as it expands and contracts can exert an amazing amount of force. It can push joints apart, or if glued in place, will likely bow. So how can he fix it in time for his granddaughter's graduation?
It appears to be a lovely box, but for the problem you (he) had with it. Dealing with expansion and contraction of wood is a challenge. Both expansion and contraction offer challenges. Build without allowing for expansion and the problems do not take long to become apparent.
I have had some luck getting boxes to come apart after removing the metal parts and putting in the microwave. It sounds crazy, but I’ve put just a bit of water in the corners of the joints and heated for as long as 15 seconds at a time.
That can soften the glue (elmers or tightbond) to the point that things can be moved or even pried apart. But the top panel being glued in place will require a lot of steps in the microwave and there is the risk of irreparable damage.
It may just be better to bite the bullet and make a new lid. And the lessons learned, painful as they are, will not be forgotten. The reader suggested that I share this to help others avoid a simple mistake. Allow solid wood panels the opportunity to move. They will.
I learned my own lessons in this regard and what my reader experienced is not uncommon.
Make, and create.
Sunday, May 14, 2017
pallet wood for box making...
 Readers are welcome to submit questions about box making and I'll try to help.
A reader from Washington State commented:
I'm just getting started making small boxes and practicing with Oak from old pallets. At 73 I'm a bit old to be starting this but I've found I really enjoy making boxes. I'd like to get good at this so I'm reading and watching everything I can and came across your site and purchased your books. Got my wood all milled down just shy of final dimension and I've been letting it sit and now I'm getting some bowing and twisting.Pallet wood can have some disadvantages. It’s free, but often not without costs. Pallets are often made of lesser quality woods and nailed together green, so stresses in the wood are constrained as long as it’s held tightly together and then are released when cut apart.
I was surprised old pallet wood would do this especially after it has been sitting in a metal shed on my ranch. Seems like the more you mill down your wood the more you release it and get the deformities. I'm using my Incra I-box jig and have done a number of plywood boxes with success and a couple of pine boxes successfully but this is the first time with Oak. I guess my choice is to mill it down some more and not let it sit or try to see how it comes out the way it's milled now.
Appreciate any help/insight.
Wood in pallets also is cut thin and dries quickly, so it could suffer the same problems that can result from kiln drying at too fast a rate. That effect is called “case hardening,” in which the inside of the wood and tensions on the surface of the board are inconsistent. Jointing and planing can release tension in the wood in that case.
When wood is stickered and dried, either properly in a kiln or just stacked in the barn, it gets air circulation on all sides but is still free to move some as it dries. If using pallet wood, you might go for a more rustic look, and save the finer techniques for finer wood. I think that trying to do the joinery quickly before the wood changes can be a formula for disappointment. Warping wood is a powerful force that can distort the shape of a box or cause it to break apart. When it comes to wood, each piece is unique, and worthy of scientific examination.
I have no definitive answers. Have fun, and if you get a pallet wood box to hold together, send me a photo.
Thursday, May 11, 2017
safety blocking...

He had not noticed any photos in the book to help him to understand what I had in mind. The first photo is from page 16 of that book. The idea is to completely cover the router bit in such a way that the work piece can enter the cut, but the fingers cannot. In both photos the router bit is buried under the safety blocking and inaccessible. The blocking must be clamped tightly in place.
 The next photo is from page 85 and shows a climb feed cut. In this photo you can see how the blocking is built in layers to provide clearance for the router bit to rotate freely.
Another reader asked where she could take classes from me. My summer calendar is shown on my website here: DougStowe.com In addition, I often travel to teach for various woodworking clubs throughout the US.
Yet another reader asked about the Porter Cable 505 half-sheet sander that I've used in my books. Porter Cable half sheet sanders are no longer available new, but my reader found one for sale on eBay. There are others there for sale as well.
Make, and create.
Saturday, April 29, 2017
beginning box making
 I got an email from a reader asking the following:
Hi Mr. Stowe,Having top of the line equipment and not knowing how to use it all is a common problem these days. In contrast, I started out poor, learned one tool at a time, and had the advantage of getting to know what each piece of equipment did best. Rather than launch you in the direction of adding one more piece of equipment, I often use self-adhesive sand paper stuck down on a flat board to do what the stationary belt sander does.
I am new to box making and find your videos fascinating. Though I am sure you hear that a lot, I just had to say it:-) While I have several of your books and have watched your videos on Finewoodworking.com, I still have a couple of questions regarding equipment. I have all of this nice near top of the line equipment since woodworking has hit me, I still do not know what I am doing most of the time.
I have several orbital sanders, should I invest in a stationary belt sander or can I use my Black and Decker 4" belt sander? It appears that I have everything else.
Lastly, when making your boxes with the hidden splines (really love those), how would you go about making sure the corners of the box really match up. Put another way, making sure all corners are near perfect? Or am I being too anal about it? Which is normal for me. In your video, I noticed the top corners of the box with the hidden spline was not (like) perfect; no disrespect. I just want to know what things I can do to make my boxes a show piece?
Thank you in advance for your advice.
I adopted this approach (particularly when teaching) because my students, new to the machine, have a tendency to screw things up, ruining the boxes they have been working so carefully (up to that point) on. I would definitely recommend against the 4 in. belt sander and would go with the sticky sand paper on a board instead. Holding a box while you attack it with a belt sander seems like a formula for injury or destruction.
Matching up the hidden splines requires careful alignment on the jig. If each corner is not carefully aligned on the jig when the routing begins, they will not align as you assemble the box. If they are aligned carefully and well clamped so they don’t shift on the jig as you cut the grooves, they have no place to go but into alignment as the box is assembled.
We all want our boxes to be show pieces. The perfection that we are used to when we go to the store or get something from Amazon is not what we can reasonably aim at as beginning craftsmen. Machine like perfection is an expression of inhumanity. The real show is not about perfection, it’s about learning. It’s about effort. It is also about forgiveness and it also about being human and having fun.
very best, and good luck with your box making.
Doug
Thursday, April 20, 2017
a jointer fence

The fence itself is formed with two parallel planes with their intersection being at the cutting edge of the bit. This set-up allows shallow cuts to be made, leaving the work-piece true on one edge.
This fence is designed to take passes of just under 1/16 in. at a time. The jointer fence is quickly made from just a stick of hardwood. A through bolt and wing nut secure one end and a "C" clamp the other.
I had tried to interest a magazine in this technique, and may try again.
Make and create.
Sunday, April 16, 2017
Babe-Bot...

You can apply just enough glue to avoid excess and mess, and extra tips are available. The advantages over the accordion style bottle are readily apparent. The accordion bottle tips need regular cleaning, and the accordion bottles are hard to fill. The steel tips on the accordion bottle can come loose during application, making a mess, and it takes more pressure to apply glue through the old style applicator. The Babe-Bot holds more glue and seals to keep it fresh. Mine was purchased at Amazon.com and I regard it as my new box making companion.
Make and create...
Saturday, April 15, 2017
adapting plans to your own use.
 |
| Tray made to fit tools box. |
I would like to take the mystery out of design, and thereby make it easier for my readers to adapt designs to fit their own needs.
So how do you craft a box to fit a particular object? The first thing is to measure it, and then use your common sense to determine the necessary space to surround it, making it easy to lift in and out of the box. For instance, I am making a tray to fit inside my tool box. Do I need plans for that, or do I simply take measurements and cut my parts to fit? Believe it or not, the same applies for making a case for eyeglasses.
After you have measured the size of the object, what comes next? Choose a box that is made using tools that you have, and in a design you like. Then alter the dimensions so that the inside space will be what you need for the object. It is simply a process of applying math.
One of the problems with plans in books or in magazine articles, is that you begin to think they are necessary. One of the advantages of writing my own books and plans is that I am allowed to simply make things without the interference of set plans.
Make and create...
Thursday, April 13, 2017
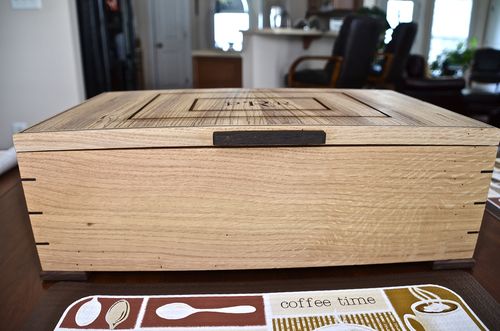
edge banding on box sides...

The secret is to form an banding material from solid woods and veneers, and then to rout the edge of the stock for the banding to fit prior to cutting the joints. That way the veneer traipses seamlessly around the top edge of the box.
The same technique was used in making this walnut box that was recently returned from Fine Woodworking where it was photographed for a hinge review.
Make, fix and create...
tool box progress

The screws that came with the hardware were too long for the thickness of the sides of this box, so I screwed them into a board and sanded the sharp ends on a belt sander until flush with it on the underside. This left the screws short enough so as to not protrude on the inside of the box.
 The first photo shows the use of folded business cards to provide a slight gap between the lid and body of the box as the hinges are screwed into place.
I will add a lift out tray on the inside, a turn button to lock the drawer and leather check straps to keep the lid from opening too far.
With the inevitable interruptions, I expect to have this finished in time for my summer box making classes at Marc Adams School of Woodworking and the Eureka Springs School of the Arts.
Make, fix and create.

Thursday, April 6, 2017
testing...
 |
| Used on the router table or clamped to a board. |
The Woodhaven jig can be clamped to a board and used with a hand held router, or on the router table as shown.
At this point, I've assembled the carcass of the large box and am beginning to make the drawer. I've selected and ordered iron hardware to complete the finished box which I intend to use when I travel to teach.
The Woodhaven jig is adjustable for box joints, from 1/2 in. up to 1 1/2 in. wide, an relies on a 3/4 in. Porter Cable style guide and a 1/2 in. carbide spiral cutter.
Check back another time to see the finished box.
Want to see photos of box making? Check out DouglasStowe on Instagram.
 |
| The sides are routed for bottom, tray guides and drawer slides |
 |
| The back of the tool box |
 |
| Assembly begins. |
Saturday, March 11, 2017
Use of a nail...

I have been making boxes with Brusso hinges. The experience of making several boxes at a time helps cure the mistakes that making a box once a year can not cure. Doug Stowe recommends using a finishing nail rather than a drill to make the holes for the screws that fasten the hinges to the box. I now understand Doug's reasoning and why the nail is a more satisfactory choice.I am not thinking that the nail does actually drill a hole, but I agree that it gives a bit more control in the location of the hole, and the chance of tweaking it if necessary. I use the nail generally for three reasons. The first it that the use of a nail is a technique my father demonstrated for me, and I feel a bit close to him when I use it. Secondly, the fine point of the finish nail is more precise and most drills of that size do not come with a brad point. The third is that the shape of the nail conforms to the shape of the screw.
The first lid I assembled was off by at least a 1/32 of an inch, maybe a bit more. I could sand the sides of the box to compensate for the crooked lid but then the mitered corners would not be square and they would look poorly. I put the box aside and started on another box. With the second box I was very careful to get the hinges in the right spot before I assembled everything. That was better but the hinges were still a bit off. I unscrewed the screws and angled the drill with the nail more to the back of the box so the screw would pull the hinge to the back. That worked well and I learned that since the nail did not remove any wood from the screw hole, as a drill bit would have removed, all I had to do was let the nail spread the wood in a slightly different direction for the screw to follow.
If I had drilled out the hole I would have had to fill in the hole with a tooth pick and fussed around a lot more. When I finished the second box I went back to the first box and removed the hinges and re-angled the holes for the screws. They pulled the hinge in the right direction and the lid lined up perfectly with the bottom. Since the nail is only parting the wood and not really removing the wood I think that after the screws are in the wood for a while the wood would relax from being spread by the nail and actually hold the screw more securely over time. At least that is what I am thinking at this time. Another benefit from using a nail instead of a drill bit is that there is no screw dust from using the nail. That is not a great big deal but it makes for a bit less mess as I work.
I am looking forward to seeing Doug Stowe at Showcase.
I am looking forward to being at Showcase as well. For information on Woodworker's Showcase click here.
Woodworkers Showcase is in two weeks.I will be teaching a class based on each of my two new books, Making Classic Toys that Teach and Tiny Boxes.
Tuesday, March 7, 2017
tiny hand made boxes...
 Bill M sent pictures of tiny boxes he made using hand tools. Because he
did not have a chisel small enough to cut tiny box joints, he ground a
cut nail to a sharp point and put a handle on it.
Bill M sent pictures of tiny boxes he made using hand tools. Because he
did not have a chisel small enough to cut tiny box joints, he ground a
cut nail to a sharp point and put a handle on it.Congratulations Bill for the tiny but exquisite work. And with hand tools, no less.
To make something useful and beautiful is to re-create oneself in that same image.

Tuesday, February 28, 2017
Shaker boxes

My own Shaker boxes are not as fine as some made by more experienced and dedicated Shaker box makers. But the point is the pleasure to be found in making them. Even with a few flaws, they are useful and will give someone pleasure to own.
I learned today that one of my students had given the one she made as a Christmas present to her Dad. It was well received. She apologized that it was not better made. But parents sometimes know the challenges involved in doing real things, and that their son's or daughter's best work will come later as they mature. In the meantime, it is a useful box that's found a place on her father's desk, and now holds precious things.
To make something useful and beautiful is to re-create oneself in that self-same image.
Friday, February 24, 2017
Infinity dovetailed splined box

I get repeat questions on occasion among those who are new to the boxmaking101blog. Don asked about the accordion squeeze glue bottles I have used in my books and DVD. A previous post addressed those and where to find them. Glue Injectors...
Make fix, create and assist others in learning likewise
Sunday, February 19, 2017
Too much information?

I can understand that some readers would like exacting instructions, but there is a very good reason to leave some out. The point in my writing it not to create exact clones of my own work, but to encourage the reader to take steps leading to growth. If everything is laid out in too much precision, where will the reader's own experimentation and growth occur? And is it not better to be puzzled and to work some things out for yourself?
Furniture designer/writer/craftsman Michael Cullen has a box project that my readers will enjoy. He provides just the right amount of information, enabling the viewer after watching a 5 minute video, to take concrete steps in making his or her own box. The point, of course, is not to exactly duplicate Michael's work. That would be a form of theft, would it not? But to watch over his shoulders as he creates a very lovely band sawn box is a valuable thing. You can watch a video of his project on the Fine Woodworking website.
I am interested in creating a boxmaking 101 news journal. If you are willing to be added to the mailing list, please email me and sign up.
To make something useful and beautiful is to re-create oneself in that same image.
Saturday, February 18, 2017
Dovetail spline system for boxes...

The system uses a router platform that can either be mounted to the box, or used inverted on the router table. The router table is my system of choice. The platform has fingers that allow it to follow a standard guide bushing mounted in the router base.
The second part of the system is equally important as it allows the box maker to cut tapered dovetail shaped splines or keys that slide tightly in place with glue. To further test the system, I'll nest an additional smaller key inside the larger ones to make an even more interesting joint.
 As you can see in the photos, so far, so good. After the glue has set, the keys will be routed flush with the box sides so the next step can be taken
You can find the Infinity system at InfinityTools.com

Tuesday, February 14, 2017
mesquite domino box
 This lovely mesquite box for dominoes was made by my cousin David Bye and submitted for publication.
If you have a box you would like to share with other readers, send photos.
I am currently making boxes to test an Infinity Dovetail Spline Jig, for a review in Fine Woodworking Magazine. So pictures of a box made with that jig will be available in the days to come.

Sunday, February 12, 2017
For the love of wood...

The point here is that creativity often starts with wood. The love of wood is why one would choose to make a box from wood rather than any other material, and having each student bring something from their own shop guarantees that at some point in the course of a week-long class in box making, each student will have done work that reflects their own values, their own sense of beauty, and their own sense of relationship.
The question my students often ask, however, is what size does it need to be in order to be useful in class? Of course it depends to some degree on the size of the box the student would want to make. Most of my box making starts with wood that is 1 in. (4 quarter) to 1 1/4 in. (5/4) thick. This leaves the wood thick enough to re-saw using either the band saw or table saw into box sides of a reasonable thickness.
The other question my students ask, is "How much wood should I bring?" Again, that depends. Not all students will have come from a driving distance away, and whatever you bring, that you can't use can be shared and used thereby to build relationships with new friends in the class.
A third question that my students often ask is 'What woods look good together?" That was the subject of an article I wrote for Woodcraft Magazine for their June/July issue available here.
Make yourself smart and your life meaningful. Try box making.
Friday, February 10, 2017
Does the lid "pop?"
I got a letter from a reader asking about the fit of lids....
This is also a matter of personal taste. One thing in your favor in making small boxes, is that due to the size of the material, you will not have movement to the same degree as is experienced in furniture making with wide panels of wood.
I hope this helps.
I have been following your designs from the book Basic Box Making, and am learning so very much. Thanks so much for sharing your passion, skill, and expertise.I would remember that wood is a living material, even after its cut and dried, in that it expands and contracts across its width due to changes in moisture content in the air. Build too tight, and expansion can push joints apart under extreme conditions. What may fit with a “pop” today may not even open tomorrow. Part of this is solved by knowing the moisture content of the woods you are using. If the moisture content of the lid is a bit high, you can build a bit tight, knowing it will shrink. If a bit low, leave it very slightly loose in fit. It might "pop" later on but not push the sides of the box loose.
I do have one quick question about the small boxes with lift off lids. How tight of a fit do you usually make the lids. I have been in a bit of disagreement with a fellow beginning box maker, so I was wondering what you have found to be best. Do you think people prefer a lid to slide off quite easily, or come off with a “pop?” I know its probably a silly question, but it is one which has kept me worried about how best to cut the lip on my lids.
Thanks so much for all you do to inspire!
This is also a matter of personal taste. One thing in your favor in making small boxes, is that due to the size of the material, you will not have movement to the same degree as is experienced in furniture making with wide panels of wood.
I hope this helps.
tools for box making

"I enjoy working carpentry as a hobby and I would like to learn about box making, I recently discovered your blog and its great, but I'm not sure if a have the right tools, of course, have some tools but I would like to know which ones do you consider are the essential ones to start working in box making and which ones you recommend to get for a better job."For a beginning box maker, even one with carpentry experience, I suggest that my reader consider one of my books, or a box making book by another fine author. They will show the kinds of tools that I routinely use and provide all kinds of techniques using those tools that will be useful in box making. I also teach summer classes and weekend classes for woodworking clubs. Having tools is sone thing. Knowing how to use them safely and effectively another.
I was reminded of a reader years ago, who knowing that his father in law was coming from Japan, wanted to make a box to give him as a gift. He chose a box from chapter 7 of my first book, then went through the book from the beginning, buying each tool. When it came time to build the box (two weeks before the arrival of his new father in law) he called me asking how to get started. Having the right tools is not the same as knowing how to use them.
That said, I use the table saw, jointer, planer, router table, clamps of various kinds, whereas the carpenter these days may use a skill saw, compound miter saw, and hammers.
In box making with kids at the Clear Spring School, we use hand saws, planes, hammers, and nails, so the full shop approach is not required, and if a person wants to get going at it, a good solution is to start with what you have and build from there.
The box shown above is by one of my 5th grade students, and made for her teacher, Hannah.
Wednesday, January 4, 2017
quadrant hinges
Readers are a source of inspiration for me. They call on occasion with questions and fresh challenges, that lead me to scratch my head, rethink my processes and attempt to clarify my techniques. Sometimes reader questions suggest articles that need to be written, or things that need to be added when I teach. The point is that we grow together.
I have submitted the idea of installing quadrant hinges to Fine Woodworking magazine, and hope to offer more information at a later date.

Today students return from holiday break to the Clear Spring School. They will be excited to be in wood shop.
Make, fix, create, and increase the likelihood that others love learning likewise.
Subscribe to:
Posts (Atom)